This post is quite a much based on following video - except we aren't using UTS2.
Here, we'll use Unity Toon Shader(UTS) which is a successor to UTS2(Unity-Chan Toon Shader 2).
Original UTS stands for Unity-Chan Toon shader, but now it doesn't have '-Chan' in it's name.
This post will use term UTS3 to refer Unity Toon Shader in order to clear up confusion.
This new shader supports both standard and SRP - suitable for modern unity developments.
If you don't have specific preference between old Unity-Chan and new Unity-Chan - you can ignore this post and go for new one, which supports URP out-of-box using UTS3.
This post will only focus on importing and converting old Unity-Chan in URP, but process shouldn't be different in HDRP.
Prep 0. Expectation

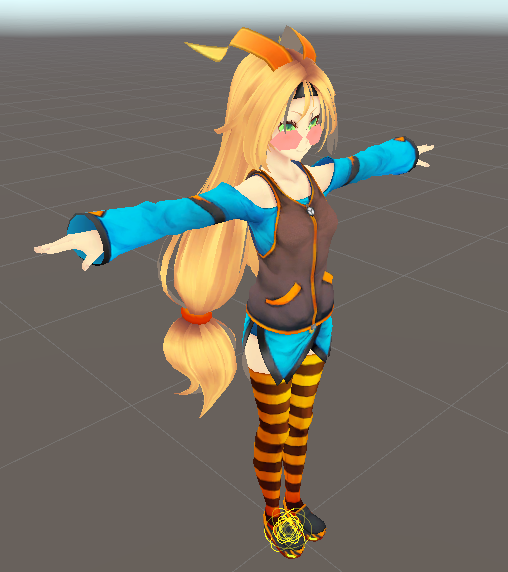
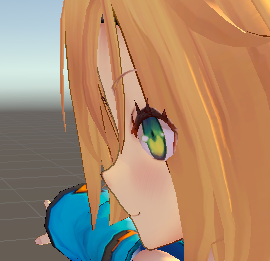
Do note, that it looks almost impossible to get the original feeling of Unity-Chan's shiny and colorful Rim Light and Specular Highlight.
That is, even if we here see her having Blue Rim Light and Orange Rim Light depending on base color Rim Light is on, but it's impossible with UTS3 - there's no setting like that.
I spent multiple full days but couldn't find any proper conversion methods for that in any of documentations.
Best bet is just to split single material to have different Rim Light / Highlight settings per mesh - which is explained below.
Prep 1. Creating Project
Anything 3D is fine, thought there may be difference in supported features they say. I'm going for URP.

Prep 2. Adding Unity-Chan
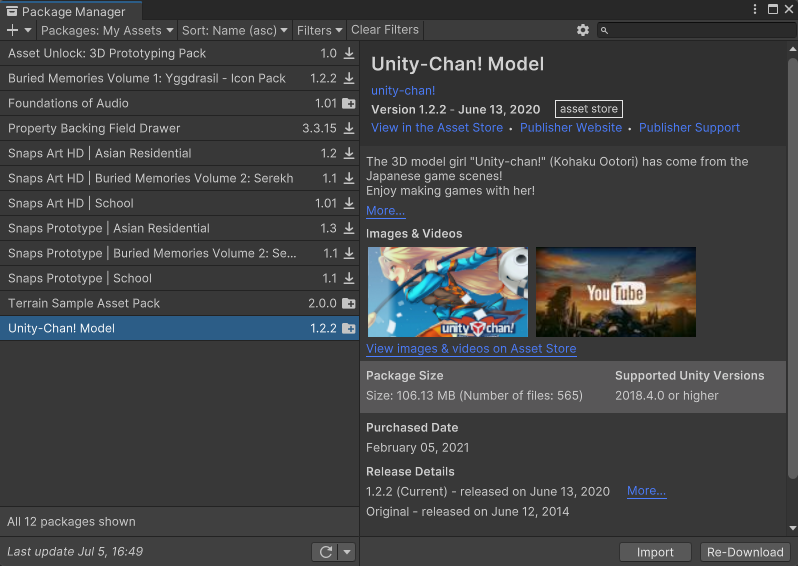
Get Unity-Chan from official Unity-Chan site, or Asset Store. I'm lazy so I'm getting one from Asset Store.
Either way, make sure to read the Unity-Chan license. It comes with custom license.
Prep 3. Adding UTS3
Add package from git URL > com.unity.toonshader > Add
Few errors might come up - but safe to ignore, probably HDRP compiles failing in URP, and vise versa. UTS3 has both.


Prep 4. Bring out Unity-Chan prefab
Location might slightly differs depending on where you downloaded it.
Drag either unitychan prefab or one with dynamic to the scene.
Only difference is whether she have spring bones, wind and blinking scripts or not.

You can just work on the prefab editor but I prefer it under scene lighting.
Prep 5. Locate model materials
Do note that depending on which way you installed the Unity-Chan, folder structure is different.
Translate Path accordingly. (For i.e. Art folder -> Model folder)
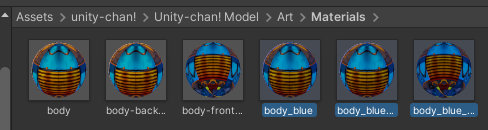
There's Materials that's directly used by Unity-Chan prefabs in Art > Materials.
(Not materials inside shader folder)

We'll just call this 'Model materials' to distinguish with similar materials in shader's folder.
Prep 6. Conversion Logic
When we check materials inside Art > UnityChanShader, you'll see there's similar materials, but not directly used by prefabs or models.
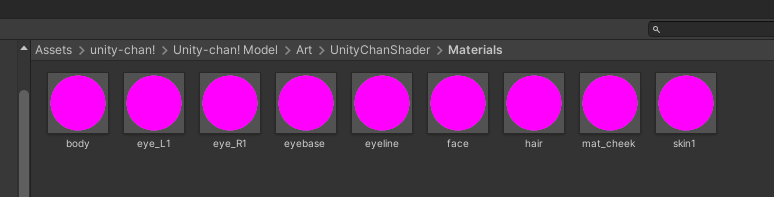
These still carries the original shader data like below.
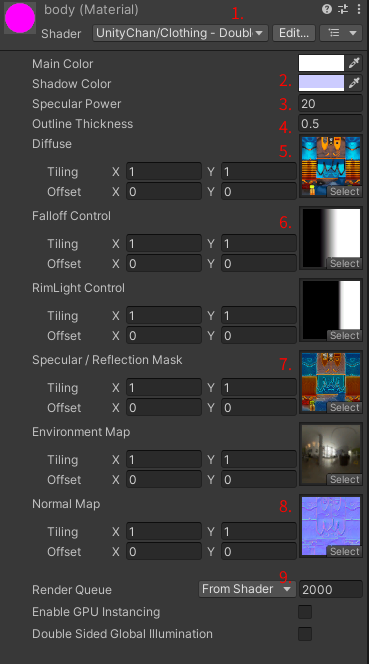
WIth this information, we'll 'try' to mimic it as much as we can.
- Main color → Base Map's Color (Already set by default)
- Shadow color → 1st Shading map color + Apply to 1st shade map check
- Specular Power → Highlight Power (No good conversion ratio. will always look less effective.)
- Outline Thickness → Outline Width
- Diffuse map → Base Map (Already set by default)
- Falloff Control Image → Base Color Step(White area %) & Base Shading Feather(Blur area %)
- Specular / Reflection Mask → Highlight Map(Image) + soft specular mode
- Normal Map → Normal Map(Image), set to 0.3 + Three Basic Colors check
- Render Queue → Not required, only change when fixing mat_cheek material.
- ...and bunch more other changes to mimic the look as much as I could
Such step goes same throughout this post, so I'll skip original material data images.
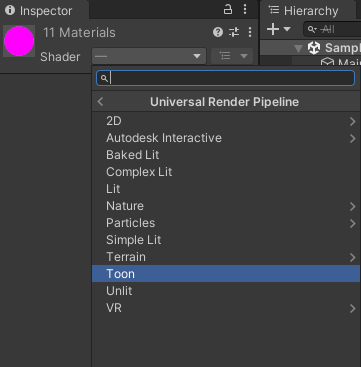
1. Convert all material's shader to URP/Toon
Select all model materials, change Shader to Universal Render Pipeline > Toon.
Then she would looks like this - We have colors at least.

2. Set All Materials' Base Color Step to 0
For all Materials, under Shading Step and Feather Settings - Set Base Color Step to 0.
IDK why but in my Unity version I can't change all material's variable at once. In that case, do it one by one.
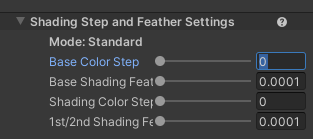
Now default shade color(White) is all gone.
3. Material - body
3.1 Body base setup


1st Shading Map color will be same throughout this post, remember it - CCCCFF
3.2 Separating frontface culling & backface culling
Now we'll have to divide this as Rim Light makes double-sided flat material bright even if it shouldn't - like hairband and skirts.


Duplicate body material, we'll make each material only deal with Front and Back side culling. (Culling = Not drawing side)
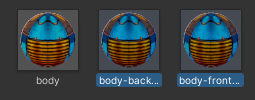
For Backface Culling material - aka front part (what a confusing name)

For Frontface Culling material - aka back part
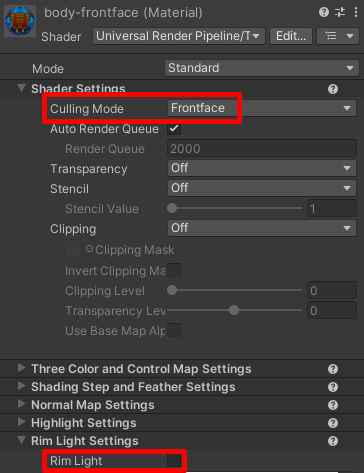
We're essentially separating Frontface and Backface of the double sided material, and disabling Rim Light on one of it.
3.3 Duplicating material to give different Rim Light & Highlight
Now, copy all 3 body materials again. and add name 'blue' for each of them.
We'll use this to give blue Rim Light / Highlight to blue cloth parts - and previous 3 as orange.
For this new 3, set color as following(except rimlight color for frontface culling)

3.4 Applying materials
Now Expand prefab instance > mesh_root > and set materials as following:
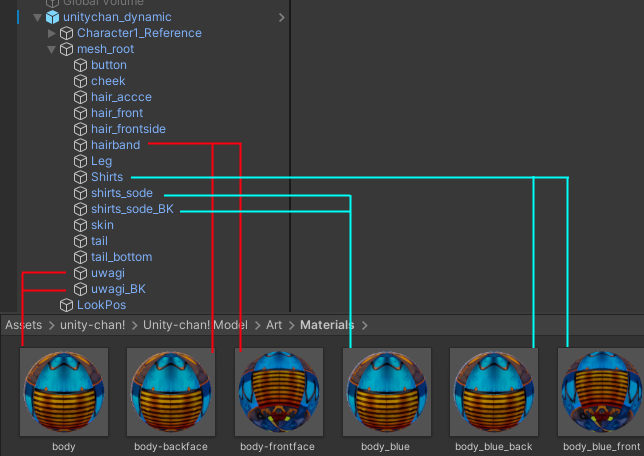

Some will need to expand materials slot to put two.
I think we could've saved 2 materials by unifying all with separated backface & frontface culling materials.
4. Material - eye_L1 / eye_R1
Also turn off outline, if active.
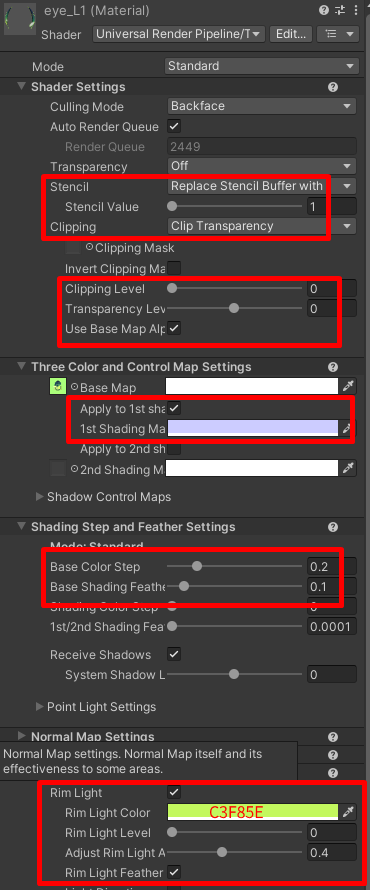
You might want to play with shading or emission settings, depending on what you prefer.
If you light lit eye in darkeness - set Base Color Step to 0.
Rimlight is optional - will only be visible in extreme angle.

With Stencil you can make eye visible over hair.
Remember we set Stencil value to 1 - This will later be used on hair.
Do same for both eye materials.
5. Material - mat_cheek
Also turn off outline, if active.

Reason for Auto value + 1 is, without that rendering order get messed up depending on angle like following.
So we're giving mat_cheek a bit lower priority in rendering queue, to make sure eye get drawn first - not vice versa.
If set to somewhat far from Auto value - this might happen:

6. Material - eyebase
Also turn off outline, if active.
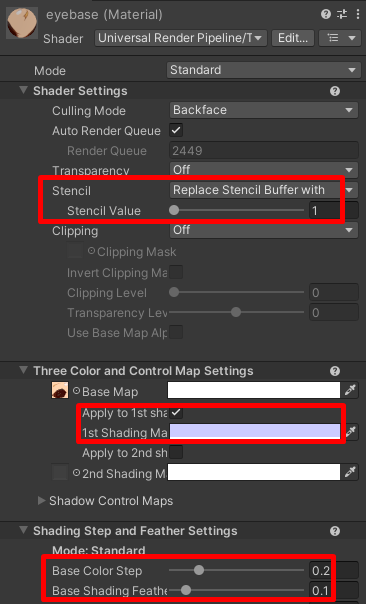
eyebase also gets the stencil, so set accordingly.
7. Material - eyeline
Also turn off outline, if active.
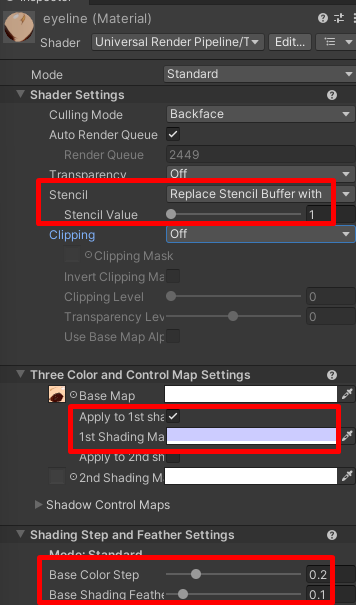
Stencil here too!
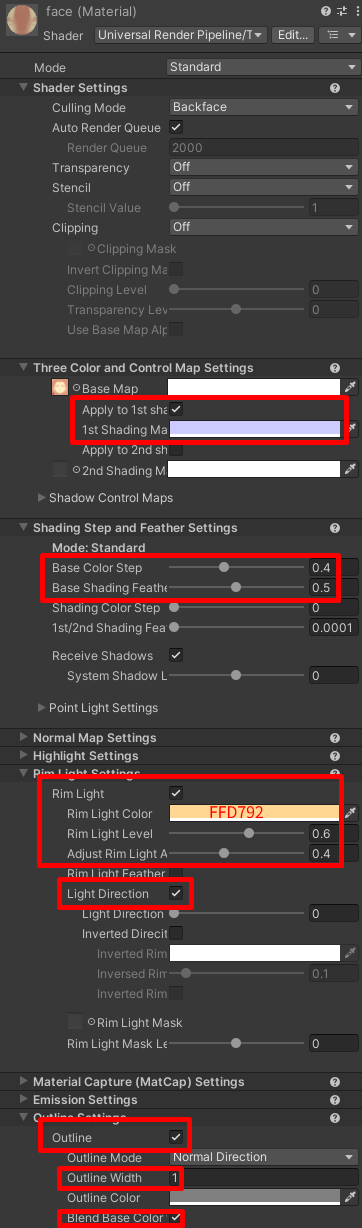
8. Material - face
9. Material - skin

10. Material - hair
10.1 Hair base


10.2 Separating backside & frontside culling
Just like with body, duplicate, set one as backface culling, other as frontface culling, and disable Rim Light on frontface culling material.

10.3 Duplicating to create stencil materials
This time copying backface / frontface culling materials only.

And set following for 2 of new materials.
10.4 Applying Materials

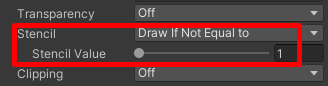
Stencil will allow eyes to be visible through front side hair.
Do note that if Transparency is on - stencil does not work.
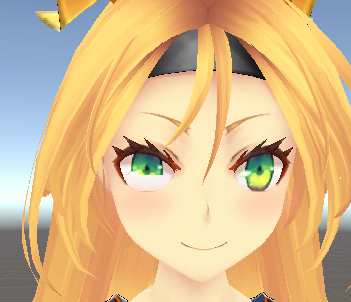
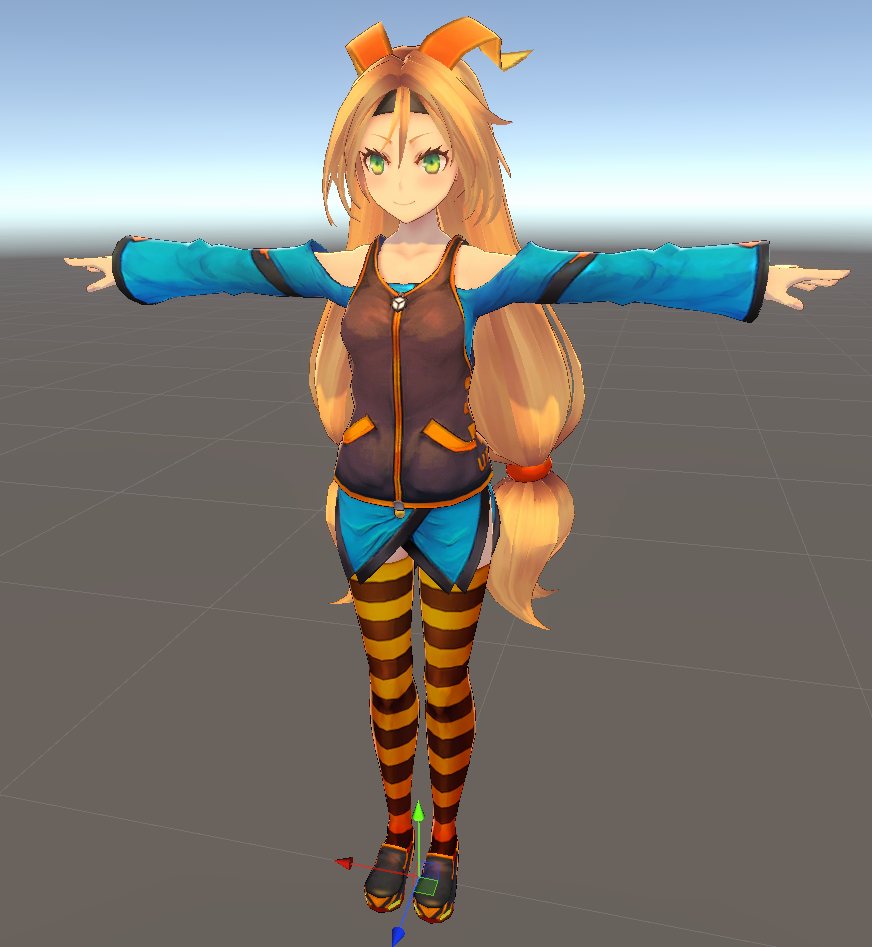
11. Done
Finally we converted a unity-chan. Not as great as it used to be, but still - quite usable.
Further reading:
GitHub - Unity-Technologies/com.unity.toonshader: Unity Toon Shader ( in progress )
Unity Toon Shader ( in progress ). Contribute to Unity-Technologies/com.unity.toonshader development by creating an account on GitHub.
github.com